from a chemistry class a few years ago was entropy. Atoms will eventually rearrange themselves to a low-energy state, given the right conditions. The better the conditions, the quicker the decay.
In the real world (apologies to Plato) Leave a metal structure, a jump ramp, for example, sitting in water long enough, and it will rust. If it is heavy and it has rusted through, it will break. Have eight people stand on the back of the ramp to reduce tongue pressure on Pat's trailer hitch and it will break right away. After an all-around expletive session, discussion veered toward topics like angle iron, stick welding, and numeric references to voltages and thickness of steel.
All I know about welding is that it's a great way to put an eye out. If Pat emails me, I'll have pictures soon.
Because jumping is rife with suspense, and narrow time windows, we have only until april 7th, when we host a collegiate tournament at our site.
An attempt to chronicle the exploits of a Louisiana-born ski bum living somewhere in corn country
Sunday, March 19, 2006
Wednesday, March 15, 2006
Measure once...
drill twice, isn't that how the old saying goes? I finally mounted my jump bindings this past weekend. My new bindings are about 1.5 inches back form my old boots, as you can see here
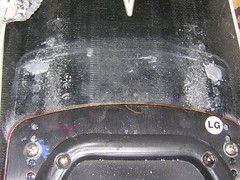
One small problem. After painstakingly measuring the exact locations to drill pilot holes, I screwed up, royally. One of the holes did not match up the binding plate's hole pattern. So I had to improvise and drill a new hole into the binding. I figured it's a lot better than drilling a new hole into the ski. A new binding base plate is much, much cheaper than a new pair of jumpers. Take a gander
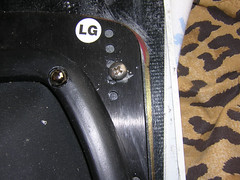
Notice the screw just to the outside of the predrilled holes. What workmanship! I hope Freddy Krueger's advice on my binding location works. Moving the bindings will be a pain in the ass if I have to do it. Hopefully, I won't.
Glitches be damned, I am done and ready to go! The new hole shouldn't compromise strength on the plate. I have my old buddy JB Weld to assure that. I set all the screws in a little dab of it. I am banking on not having to mess with the overlays this year, knock on wood.
So here they are, in all their mounted glory
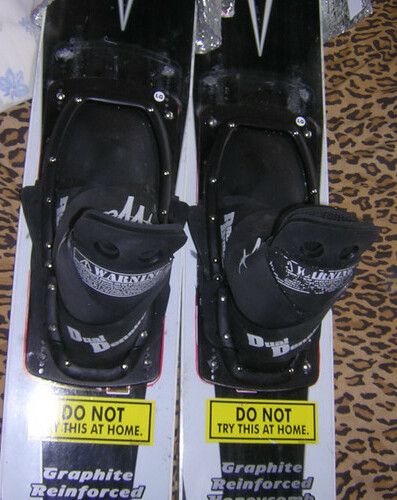
Nothing left do but wait impatiently to hit the ramp again.

One small problem. After painstakingly measuring the exact locations to drill pilot holes, I screwed up, royally. One of the holes did not match up the binding plate's hole pattern. So I had to improvise and drill a new hole into the binding. I figured it's a lot better than drilling a new hole into the ski. A new binding base plate is much, much cheaper than a new pair of jumpers. Take a gander

Notice the screw just to the outside of the predrilled holes. What workmanship! I hope Freddy Krueger's advice on my binding location works. Moving the bindings will be a pain in the ass if I have to do it. Hopefully, I won't.
Glitches be damned, I am done and ready to go! The new hole shouldn't compromise strength on the plate. I have my old buddy JB Weld to assure that. I set all the screws in a little dab of it. I am banking on not having to mess with the overlays this year, knock on wood.
So here they are, in all their mounted glory

Nothing left do but wait impatiently to hit the ramp again.
Tuesday, March 07, 2006
The best time of year to...
do any type of repair to your equipment is in the winter. I've had to mount new jump bindings and repair the right edge of my trick ski before spring, and I have done so in a fashion that is nothing short of anal. To fix the trick ski, I mixed up a dollop of JB Weld Steel epoxy resin, and spent a good forty 45 minutes applying a thin strip along a 6 inch section of the edge of the ski. After waiting 24 hours for the axes to cure. I sanded it with two grades of sandpaper: first 100 grit to get rid of the bumps, then 400 grit waterproof sandpaper to remove the imperfections along the outer edge and bottom side. If I had noticed this in the summer, I would have quickly applied the resin, smoothed it out with my finger, and called it done.
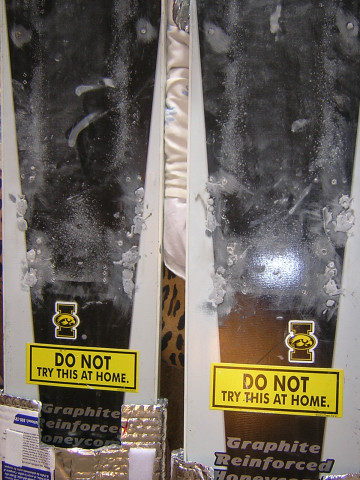
Mounting my jump bindings has been almost as bad. I spent a good hour per ski filling each hole. I twirled each toothpick in a the tiny puddle of JB Weld, allowing a string of gray thin enough to fit into the old binding holes. Slowly lower trail of JB into the tiny hole, repeat five times per hole, repeat for five more holes. Wait 24 hours and sand to a relatively flat surface, as shown
That was the easy part. The next thing to do was to mark the new hole pattern on top of the ski. First, I measured the distance from the rear horseshoe to the tail of the ski. Freddy Kreuger recommended 29.5" when I asked him about it at the Midwest winter conference in Iowa City (Nice job hosting, Christy and Co.). That's about as good as source as I'll get, so I went with it.
After getting the tail measurement, I measured the distance across the skis at three points, each corresponding to hole locations. Then I measured the distance across the binding plates (yes, they do get narrower toward the heel end)and did some subtraction and division. An hour of measuring later, I'm within a millimeter of center with both boots. To mark the holes, I pressed down on the binding to account for the slight bend in the plate. Pressing down, I dabbed inside the holes with fingernail polish. A lovely shade of pink, I might add. The bindings however, are not yet mounted. I'm holding out until this weekend when I can use my father-in-law's drill press to make starter holes. till then the boots just sit idly, like this
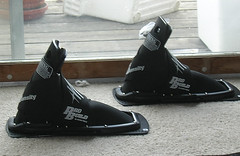
In the summer, I would have covered the old holes with duck tape, measured tail distance, eyeballed side-to-side distance, and drove the screws straight in with elbow grease. 20 minutes, done. I would not want to waste that much ski time fixing equipment. Lucky, for winter, I guess.
No, winter sucks.
Mounting my jump bindings has been almost as bad. I spent a good hour per ski filling each hole. I twirled each toothpick in a the tiny puddle of JB Weld, allowing a string of gray thin enough to fit into the old binding holes. Slowly lower trail of JB into the tiny hole, repeat five times per hole, repeat for five more holes. Wait 24 hours and sand to a relatively flat surface, as shown

That was the easy part. The next thing to do was to mark the new hole pattern on top of the ski. First, I measured the distance from the rear horseshoe to the tail of the ski. Freddy Kreuger recommended 29.5" when I asked him about it at the Midwest winter conference in Iowa City (Nice job hosting, Christy and Co.). That's about as good as source as I'll get, so I went with it.
After getting the tail measurement, I measured the distance across the skis at three points, each corresponding to hole locations. Then I measured the distance across the binding plates (yes, they do get narrower toward the heel end)and did some subtraction and division. An hour of measuring later, I'm within a millimeter of center with both boots. To mark the holes, I pressed down on the binding to account for the slight bend in the plate. Pressing down, I dabbed inside the holes with fingernail polish. A lovely shade of pink, I might add. The bindings however, are not yet mounted. I'm holding out until this weekend when I can use my father-in-law's drill press to make starter holes. till then the boots just sit idly, like this

In the summer, I would have covered the old holes with duck tape, measured tail distance, eyeballed side-to-side distance, and drove the screws straight in with elbow grease. 20 minutes, done. I would not want to waste that much ski time fixing equipment. Lucky, for winter, I guess.
No, winter sucks.
Wednesday, March 01, 2006
T minus.....
one month to go. March 1st. It will happen slowly, week by week. The temperature will increase, and the ice will melt. I will start off by daydreaming more. It will progress into a full-blown case of the shakes, like a nicotine addict on the drive to his favorite convenience store. Meanwhile, I have to keep working out, while not flunking out of nursing school in my last semester. Then there's the matter of boards and a post-graduation job.
Subscribe to:
Comments (Atom)